Saturday, November 17, 2018

Customization in drupal 8 core contact form using form alter

How to change Drupal 8 Core Contact form fleld label :-

 If you want to change Contact form "Message" field label you can use "hook_form_alter" .

either you can create a custom module or either you can add form alter in your theme file also.

 
function your_theme_form_alter(&$form, \Drupal\Core\Form\FormStateInterface $form_state, $form_id) {
       if ($form_id == 'contact_message_feedback_form') {
        $form['message']['widget'][0]['value']['#title'] = t("My Custom Body Label");
     }
} 


Add placeholder in default search using form alter

function your_theme_form_alter(&$form, \Drupal\Core\Form\FormStateInterface $form_state, $form_id) {
    if (in_array($form_id, ['search_block_form', 'search_form'])) {
        $form['keys']['#attributes']['placeholder'] = t('Search...');
    }
   }if ($form_id == 'contact_message_feedback_form') {
  $form['actions']['submit']['#value'] = t("My Altered submit button text here");
  $form['subject']['widget'][0]['value']['#title'] = t ("My Altered title here");
  $form['message']['widget'][0]['value']['#title'] = t("My custom body text here");
        //$form['message']['widget'][0]['value']['#title'] = t("My Custom Body Label");
  $form['#suffix'] = "<div class='extra-text'><p>Show some text before the comment form.</p></div>";
     }
} 

Friday, November 2, 2018

Create Instances at AWS (Amezon Web services) and connect through SSH.

Step 1: Login your AWS Account.

Step 2: At the navigation click on services, and select "EC2".

Step 3 : If you want to create new site or application or Instance, you need to click on "launch Instances".

Step 4: There is a option for free and paid server for creating instances. ("Choose an Awazon Machine Image (AMI)")

Note : Amazon web services provide you 8 TB space if you want more than it you need to select paid server.

Step 5 : Go through all the steps, there is a option of create key pair, it will use to connect your AWS website with ssh, but remember on thing you can create a pair key only one time and if another user want to access this folder you have to share your pair key.

eg. test.pem file


Step 6 : Connect instances using ssh and pem file

download your pem file and put this at your desktop and connect through ssh username and password.


Step 7 : you need to give the permission of your pem file to read and write.

$ chmod 400 test.pem


Step 8 : SSH Command :

ssh -i YOUR_PEMFILE.pem user@publicdns/domainname

ex - ssh -i xyz.pem ec2-user@ec2-45-415-458.compute-1.amazonaws.com

 
Step 9 : Now you will connect to your AWS Account :)

Step 10 : At AWS account click on your instances, below you will find description tab under that public DNS(IPv4)  ec2-45-415-458.compute-1.amazonaws.com, click on that link you will redirect your web page of your instances.


Monday, October 29, 2018

How to Change 'Any' option in exposed filter in Drupal 8.


If you Want to Change label of "Any" in exposed filter option in Drupal 8. You can use "Better exposed filter" . here thesome step to change of Any text in D8.

Step 1 : Open your Better exposed filter setting and find out the filter in which you want to change the label.

Step 2: Scroll down at the bottom select  "More options for "field_ad_category_target_id(your filter name)".


Step 3 : Click on "Rewrite filter options"


Step 4 : put this in "Retrite the text option"

 example : - Any -| Your option

Step 5: in my case i want to change "Any" label to 'Your option'. i hope this will work for you :)

Wednesday, October 24, 2018

My trick to add Colorbox popup on Slideshow images in Drupal 8

Hello, If you want to show any slider image in the popup form on click on image
here is the my funny or easy trick to do it. i hope it will work for you :)

Trick 1 :-  I have a task that i have created a slider using image fieldslideshow , i have done this by using view and just set image formatter as image fieldslideshow but now requirement is that when we click on the image it should be open as colorbox popup.


solution : -
   step 1 :- I have added a same image field in view and set formatter "colorbox" and excluded that filed, its all because shwo we can found colorbox library on required page.

step 2 :-  just change twig file structure according colorbox :-

From :-

{% for key,value in url %}
            <img src="{{ value }}" />
        {% endfor %}


To :-

{% for key,value in url %}
    <a href="{{ value }}" class="colorbox cboxElement"><img src="{{ value }}" /></a>
    {% endfor %}

Step 3 :- Now you will be able to see popup on your slider image


Trick 2 - Need to add popup on field slide show image.

Step 1:- i have set filed slideshow on display format of image and link image to file.

Step 2:- create a other image field to and set Colorbox format to call Colorbox library, set a default image in this field, disable from disaplay form, and just add Css for display none.

Step 3 :- there is same structure which we want for colorbox popup except colorbox class so i have  added class using jquery

jQuery('.field--name-field-product-image .field-slideshow').find('a').addClass('colorbox cboxElement');


How to Show all products and node related to the node user


When we click on the node or product and you want to show show all the products related to the user who publish the current user. you have to apply filter user id filter i am showing you in the below post.


Step 1 : - Firstly you have to change the "url alias" for the node and need to add author name.

eg. if you have product content type your path pattern should be like              
 ( [node:title]/[node:author] ) this.

path pattern:- [node:title]/[node:author]


Step 2 :- You Need to add "user Name" contextual filter in the view block.
if your url link this ->  
http://115.166.142.238/souq_alhrag/ar/samsung-galaxy-j2-core/customer

http://<ip>/<projectname>/<language>/<nodeid>/<username>

select raw value under "Provide default value"and path alias 2 in my case.


Exclude current Node in Block view in Drupal 8

If you want to exclude current node and product in block view in drupal 8 pls follow the below steps.


Step 1 :-  Create a block view.

Step 2 :-  Add Content Under "Contextual Filters", select "Provide Default value"->"Content Id from url"


Step 3 :- Scroll Down at bottom and Check "Exclude" under "More".

 
Step 4 :- Apply filter and save changes , now only content id which is the url doesn't show in the block view.

Tuesday, October 23, 2018

How to Add Popup using jQuery

Add popup on any div using jQuery :-


HTML : -

<div class="disclaimer custom-popup">
    <div class="container">
        <div class="close">X</div>
        Lorem Ipsum is simply dummy text.
        </div>
    </div>
<div class="disclaimer-show">Disclaimer</div>


JQuery : -

jQuery(document).ready(function(){
    /*Disclaimer popup*/
jQuery('.disclaimer').hide();
jQuery(".disclaimer-show").bind('click', function () {
    jQuery(".disclaimer").show();
    jQuery(this).hide();
})

jQuery('.close').bind('click', function () {
    jQuery('.disclaimer').hide();
    jQuery('.disclaimer-show').show();
})

});


CSS : -
.custom-popup {
    position: fixed;
    top: 0;
    left: 0;
    width: 100%;
    height: 100%;
    background-color: rgba(255,255,255,0.85);
    z-index: 9999;
    overflow: auto;
    padding: 25px;
}
.custom-popup .container {
background-color: #fff;
    max-width: 1170px;
    margin: 50px auto;
    border: 1px solid #0098DB;
    padding: 30px 50px;
    position: relative;
}
.custom-popup .close {
    width: 32px;
    height: 32px;
    background-color: #0098DB;
    text-align: center;
    color: #fff;
    font-size: 22px;
    position: absolute;
    right: -15px;
    top: -15px;
    line-height: 32px;
} 


Add Node as a popup in Drupal 7

How to Show Any Node in the popup form in Drupal 7 :-


If you want to Show any node or page in the poup form when click on the link add the link in this format in your block.

 <div><a class="colorbox-node colorbox-node-gallery" href="/disclaimer?width=600&height=600" rel="gallery">My Popup Example</a></div>  


Monday, October 22, 2018

How To Translate Read more text in Drupal 7

Translate Read More link in drupal 7 : -

under config->translate interface click on translate tab, then select "Read More" string in string search.


 click on edit and then put your required string in required language.


 path : yourdomainname/admin/config/regional/translate/translate  

Sunday, October 21, 2018

Import and Export Database using ssh


Import Database using ssh :- 

 mysql -u <database_username> -p -D <Your_databasename> < <database_path>  
 Example :-   
  mysql -u abcpanam_devuser -p -D abcpanam_abcpanama < abcdistr_abcpanama(1).sql 


Export Database using ssh :- 

 [abcdistr@server ~]$ mysqldump -u abcdistr_ntf -p abcdistr_abcpanama > abcdistr_abcpanama.sql 


IMPORT AND EXPORT DATABASE AT lOCALHOST USING TERMINAL

Connect Terminal to database

 $ mysql -h 127.0.0.1 -u root  
 $ /opt/lampp/bin/mysql -uroot -ppassword  
 ntf-22@NTF-22:/$ /opt/lampp/bin/mysql -uroot (IF THERE IS NO PASSWORD) 


IMPORT :-

ntf-22@NTF-22:~$ sudo /opt/lampp/bin/mysql>mysql -u root ssh_test_db < /home/ntf-22/Desktop/abcdistr_abcgrouptt.sql  
ntf-22@NTF-22:~$ sudo /opt/lampp/bin/mysql>mysql -u <database_username> <database_name> < <downloaded_database_sql_file_path_at_your_system>  

EXPORT:-

ntf-22@NTF-22:~$ /opt/lampp/bin/mysql>mysqldump -u root -p ABC_magento_db > ABC_magento_db.sql  
 ntf-22@NTF-22:~$ /opt/lampp/bin/mysql>mysqldump -u <database_username> -p <database_name> > <new_database_name.sql> 

Basics Ubuntu Terminal commands


Some basics command to use terminal in Ubuntu Linux

S. NO
COMMAND
EXAMPLE
BRIEF DESCRIPTION
1.
cd <folder_name>
ntf-22@NTF-22:~$ cd /home/ntf-22/
To enter in a folder
2
cd  ..
ntf-22@NTF-22:~$ cd ..
exit from a folder
3
cd  /..
ntf-22@NTF-22:~$ cd /..
Exit from all folder and move at root
4
pkill  <software_name>
ntf-22@NTF-22:/$ pkill geany
Used to close specific software.
5
<software name>
ntf-22@NTF-22:/$ geany
Open directly through terminal
6
ssh username@domain
ntf-22@NTF-22:~$ ssh ntf-15@192.168.1.101

Connect other system using terminal
7
sudo mv frompath topath
ntf-22@NTF-22:/$ sudo mv opt/lampp/htdocs/swati-drupal home/ntf-22/Downloads

Move folder from terminal


8
sudo frompath/foldername  topath/folderRename
ntf-22@NTF-22:/$ sudo mv opt/lampp/htdocs/swati-drupal home/ntf-22/Downloads/swati-move
Move and Rename  folder using terminal
9
grep sshd /var/log/auth.log
ntf-22@NTF-22:~$ grep sshd /var/log/auth.log

Know whoes access your system and when .
10
gksu gedit /etc/hosts
ntf-22@NTF-22:~$ gksu gedit /etc/hosts
Search your website which you want to unblock and delete, if you want to block add url of the site.
11
mkdir <filename>
ntf-15@NTF-15:~/Music$ mkdir tt

Creating folder using command
11
rmdir <filename>

ntf-15@NTF-15:~/Music$ rmdir tt
Remove Folder Using command.
12
pwd
ntf-15@NTF-15:~$ pwd

Print Current Working Directory
Show in which directory are you working.
13
ls
ntf-15@NTF-15:~$ ls
Print List of Directory
14
history -c
ntf-22@NTF-22:/$ history -c
Clear history of open terminal.
15
cp -R source destination
ntf-22@NTF-22:~/Downloads$ cp -R /home/ntf-22/Downloads/testing /home/ntf-22/Desktop/
Copy and paste from terminal you can also copy and paste your file
16
zip -r folder.zip folder
ntf-22@NTF-22:~/Downloads$ zip -r testing.zip /home/ntf-22/Downloads/testing
Create zip file using terminal
17
pathwhereyouwanttoxtract$ unzip folder.zip
ntf-22@NTF-22:~/Downloads$ unzip drupal8.zip

Extract folder using terminal
18
$ passwd
ntf-22@NTF-22:~$ passwd

Change password for
system
19
$ scp source_path  user@domain:/destinationpath
ntf-22@NTF-22:~$ scp /home/ntf-22/Downloads/test.php ntf-15@192.168.1.101:/home/ntf-15/Desktop

Put file in other system
20
$ scp user@domain:/path yourpath
ntf-22@NTF-22:~$ scp ntf-15@192.168.1.101:/home/ntf-15/Desktop/t.png /home/ntf-22/Desktop/
Get from other system
21
php -m
ntf-22@NTF-22:~$ php -m
it shows the list of enable module in php
22
php -m | grep <name of extention>

ntf-15@NTF-15:/$ php -m | grep ctype

Checking extension enable or not in your php server
23
sudo apt-get install php7.0- <name of extention>
ntf-15@NTF-15:/$ sudo apt-get install php7.0-dom
To install php extension in server

How to Connect ssh in ubuntu linux.


Connect Cpanel using ssh in Ubuntu linux :-
 
  1. Create ssh key 
  2. Authorize key
  3. Download id_rsa.pub file
  4.  Put this file at your system where ever you want. In my case i always prefer Desktop
  5. Open your Terminal 
  6. Open Folder where have you put id_rsa.pub file like
     ntf-22@NTF-22:/$ cd home/ntf-22/Desktop/ 
  
   7) Now You will see like this            

     ntf-22@NTF-22:~/Desktop$   
  
  8) Here you have entered in Desktop folder
    9) connect ssh using pub file
    ntf-22@NTF-22:~/Desktop$ ssh -i id_rsa abcdistr@abcdistributionusa.com  


10) Connect SSH when specific port is define  
   ssh -p 2222 abcpanam@162.241.224.18  
   ntf-22@NTF-22:~$ ssh -i id_rsa.pub -p 2222 abcpanam@abcpanamainc.com 

 
 The main ssh Connect command is (ssh -i <name_of_pub _file> username@domain)  
  In my case pub fille
  name is = id_rsa
  Username = abcdistr
  Domain = abcdistributionusa.com
 
 eg.
 10) Enter Cpanel password
   abcdistr@abcdistributionusa.com's password:  
 
  11) you will see like this   
   Last login: Fri Dec 15 09:39:53 2017 from 115.166.142.238  
   [abcdistr@server ~]$  
  
  12) You have successfully access using ssh but if you get ssh enable error then consult with  help and support they will enable ssh for your account. :)

Saturday, October 20, 2018

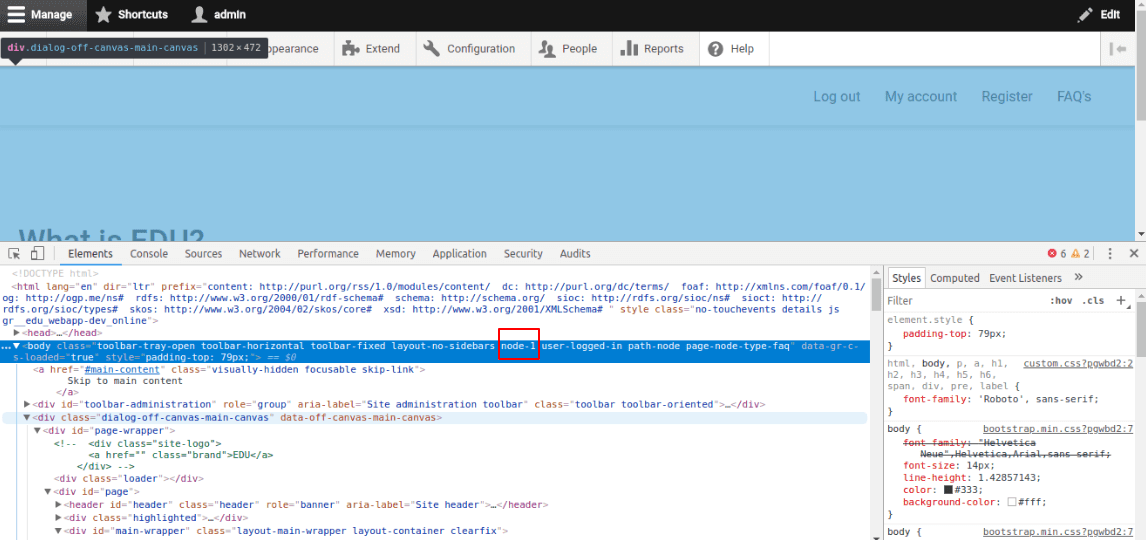
How to add missing node id in Drupal 8

Add Missing Node id in drupal 8 :- 


By default node id will not be there in the drupal 8. to enable this you have to add this code in your .theme file ->

   function THEMENAME_preprocess_html(&$variables) {  
    // Add node id to the body class.  
    $node = \Drupal::routeMatch()->getParameter('node');  
    if($node) {  
     $variables['attributes']['class'][] = 'node-' . $node->id();  
    }  
   }