Monday, March 23, 2026

Scalability Fundamentals in System Architecture

🧱 What is Scalability (in Architecture)?

 https://miro.medium.com/v2/1*687dY4wFYAbgsKFXb8sGWQ.png

Scalability = the ability of a system to handle increasing load without breaking or slowing down significantly.

In simple terms:

If your users go from 1,000 → 1,000,000, your system should still work smoothly.”


 ðŸŽ¯ Why Scalability Matters

As an architect, your job is to ensure:

  • System doesn’t crash under load
  • Performance remains stable
  • Costs stay controlled


🔑 SCALABILITY BASICS 

1️⃣ Types of Scaling

🔼 Vertical Scaling (Scale Up)

  • Increase power of one machine (CPU, RAM)

Example:

  • Upgrade server from 4GB → 32GB RAM

✅ Simple
❌ Has limits (can’t scale forever)


➡️ Horizontal Scaling (Scale Out)

  • Add more servers

Example:

  • 1 server → 10 servers behind a load balancer

✅ Highly scalable
✅ Used in modern systems

👉 Architects prefer this


2️⃣ Load Distribution

⚖️ Load Balancing

Distributes traffic across servers

Example:

  • 10,000 users → spread across 5 servers

Benefits:

  • Prevents overload
  • Improves availability

3️⃣ Stateless vs Stateful Systems 


Stateless (Preferred)

  • Each request is independent

Example:

  • APIs where no session stored on server

✅ Easy to scale

Stateful

  • Server stores session

❌ Hard to scale

👉 Solution:

  • Use Redis / external session store


4️⃣ Database Scaling

📦 Read vs Write Problem

Read Scaling

  • Use read replicas

Write Scaling

  • Harder → use:
    • Sharding
    • Partitioning
       

5️⃣ Caching (MOST IMPORTANT)

Instead of hitting DB every time:

  • Store frequent data in cache

Example:

  • Homepage content
  • User profiles

Tools:

  • Redis

👉 Reduces load dramatically


6️⃣ Asynchronous Processing

Don’t do everything in real-time.

Example:

  • Sending email after signup

Use:

  • Queues

Benefits:

  • Faster response
  • Better scalability


7️⃣ Microservices (Advanced Scaling)

Break system into smaller services:

  • User service
  • Payment service
  • Notification service

Each can scale independently

8️⃣ Fault Tolerance

System should not fail completely if one part breaks.

Example:

  • If email service fails → app still works


Sunday, November 28, 2021

Drupal Coding standard (Drupal and DrupalPractice) Setup

 Hello Drupalers,

Hope all are good and healthy.

Today we are going to discuss about how we can keep our code according the Drupal coding standard. While we write any code we keep logics according the functionality but its also important to write code according the standard.

Now Question is how we can check our code is according to standard or not. So in Drupal we usually check according the Drupal and DrupalPractice Coding Standard.

First we have to install and setup phpcs and phcbf in our local repo.


 composer create-project drupal/recommended-project drupal_contrib  
 composer require drupal/coder dealerdirect/phpcodesniffer-composer-installer  
 vendor/bin/phpcs --config-set installed_paths vendor/drupal/coder/coder_sniffer/  
 vendor/bin/phpcs -i  


we have to run all phpcs commands from vendor/bin/phpcs because we are setting up standards with local repo.

after setup Drupal and DrupalPractice standard install need to check the installed version.
To check installed version run 

The installed coding standards are PSR2, Squiz, PSR1, Zend, MySource, PEAR, PSR12, Drupal, DrupalPractice and VariableAnalysis


That's it if you find the Drupal and DrupalPractice in installed version you can use the to check your code accordingly.


Commands to check code according the Drupal Standard.

 vendor/bin/phpcs --standard=Drupal web/modules/contrib/<Module_name>  
 vendor/bin/phpcbf --standard=Drupal web/modules/contrib/<Module_name>  
 vendor/bin/phpcs --standard=DrupalPractice web/modules/contrib/<Module_name>  

Friday, March 20, 2020

Check deprecation and Make your project Drupal 9 compatible


Hello Drupalers,

As we know Drupal 9 will be release at 3rd of june 2020.

Drupal 9 = Drupal 8 - remove deprecation + increase dependency package


you are here because you also want to know ->

  • How we can make our project Drupal 9 compatible ? 
  • How we can check deprecated code ?


Drupal-check :- We can check all deprecated method using the "drupal-check".


Drupal check will provide you a result based on your project which deprecated method you used in your code and in the place of that code what should we should.


Install Drupal -check : - Download package using below command

 curl -O -L https://github.com/mglaman/drupal-check/releases/latest/download/drupal-check.phar  
 mv drupal-check.phar /usr/local/bin/drupal-check  
 chmod +x /usr/local/bin/drupal-check  


Composer :-
You can install this in your project using Composer as a development dependency like so:

 composer require mglaman/drupal-check --dev  


You can also install this globally using Composer like so:


 composer global require mglaman/drupal-check  


 Check Deprecation :- Now your system is ready to check any Drupal check with deprecation then you can make the project compatible with Drupal 9

If you installed drupal-check locally, open your terminal and run below command.

 lenovo@lenovo-ThinkPad-L450:/var/www/html/drupal_directory $ vendor/bin/drupal-checck web/modules/contrib/module_name  


If there is any error you will be able to see result like :-


  21   Call to deprecated function db_select():                  
      in drupal:8.0.0 and is removed from drupal:9.0.0. Instead, get       
      a database connection injected into your service from the container and   
      call select() on it. For example,                      
  ------ -------------------------------------------------------------------------  
  [ERROR] Found 1 errors  


Now you can remove deprecated code and make its Drupal 9 compatible.


How Drupal will know your project Drupal 9 compatible ?

Here is a way to let know Drupal.org that our module is Compatible with Drupal 8 and Drupal 9

 core_version_requirement: ^8 || ^9  


Add this line in your project info file. If want to know more about core_version_requirement see core_version_requirement


I hope guys you like this, if you have any suggestion and correcction feel free to comment here. Thanks 😊

Thursday, March 19, 2020

How Drupal Core release version decides ?

Hello Drupalers,

There is one interesting thing about Drupal version.

Have you ever been thought how core contributor decided the Drupal release number ? 🤔


Today i am going to tell you how the core release version decide.

"Since Drupal 8.8.0 Core release follow the semantic versioning (semver) numbering system."

  • Semantic versioning numbering uses three numbers instead of two  i.e (8.2.6)

In 8.2.6 first number is the major release number, second is minor number and third is patch number .

First Number (Major version) :- You are actually breaking API , there's no backwards compatibility with old API.

Second Number (Minor version) :- Minor version does not break compatibility with old version (Drupal 8.2 won't break compatibility of 8.1), This number is used for big changes or new feature.

Third Number (Patch Number) :- last number only shows bug fixes.


For more information please visit :-  Drupal Core release cycle

"Most Welcome any suggestion and correction in blog".

Thanks 🙂

Headless drupal 8 with vue js

Hello Drupalers,

Today i am going to show you how can create headless website with  Drupal 8 and vue.


We will step by step to create headless website.

Step 1 : -  Install a fresh Drupal 8.  In my case i  installed drupal with composer .

 composer create-project drupal-composer/drupal-project:8.x-dev decoupled_drupal --stability dev --no-interaction  

Step 2 : - In this case we will use rest api to get  drupal content data in our vue app using "REST Module."


Step 3 :-  Create custom content type as  i have created content type "Album" and added some fields


Step 4 :- create view for rest export data.

 make sure your api path (i.e api/edm-album)


Note : Now Drupal is ready for headless use now we will create vue frontent to get this api data and will dispaly on frontent.


Step 5  :- Inside of your Drupal folder install Vue-cli wo we can use


 lenovo@lenovo-ThinkPad-L450:/var/www/html/decoupled_drupal/drupalvue $ sudo npm install -g vue-cli  

Step 6 :-  Setup Vue instance for headless use

 vue init webpack <name_of_project folder>  
 # install dependencies and go!  
 cd <name_of_project folder>  
 //install node dependencies from package json  
 npm install  
 // run this command to start your project  
 npm run dev  


Last command is used for serve react application and after that you will be able to see some url like

http://localhost:8080/


make sure you are running above commands from your drupalvue directory.


Saturday, November 17, 2018

Customization in drupal 8 core contact form using form alter

How to change Drupal 8 Core Contact form fleld label :-

 If you want to change Contact form "Message" field label you can use "hook_form_alter" .

either you can create a custom module or either you can add form alter in your theme file also.

 
function your_theme_form_alter(&$form, \Drupal\Core\Form\FormStateInterface $form_state, $form_id) {
       if ($form_id == 'contact_message_feedback_form') {
        $form['message']['widget'][0]['value']['#title'] = t("My Custom Body Label");
     }
} 


Add placeholder in default search using form alter

function your_theme_form_alter(&$form, \Drupal\Core\Form\FormStateInterface $form_state, $form_id) {
    if (in_array($form_id, ['search_block_form', 'search_form'])) {
        $form['keys']['#attributes']['placeholder'] = t('Search...');
    }
   }if ($form_id == 'contact_message_feedback_form') {
  $form['actions']['submit']['#value'] = t("My Altered submit button text here");
  $form['subject']['widget'][0]['value']['#title'] = t ("My Altered title here");
  $form['message']['widget'][0]['value']['#title'] = t("My custom body text here");
        //$form['message']['widget'][0]['value']['#title'] = t("My Custom Body Label");
  $form['#suffix'] = "<div class='extra-text'><p>Show some text before the comment form.</p></div>";
     }
} 

Friday, November 2, 2018

Create Instances at AWS (Amezon Web services) and connect through SSH.

Step 1: Login your AWS Account.

Step 2: At the navigation click on services, and select "EC2".

Step 3 : If you want to create new site or application or Instance, you need to click on "launch Instances".

Step 4: There is a option for free and paid server for creating instances. ("Choose an Awazon Machine Image (AMI)")

Note : Amazon web services provide you 8 TB space if you want more than it you need to select paid server.

Step 5 : Go through all the steps, there is a option of create key pair, it will use to connect your AWS website with ssh, but remember on thing you can create a pair key only one time and if another user want to access this folder you have to share your pair key.

eg. test.pem file


Step 6 : Connect instances using ssh and pem file

download your pem file and put this at your desktop and connect through ssh username and password.


Step 7 : you need to give the permission of your pem file to read and write.

$ chmod 400 test.pem


Step 8 : SSH Command :

ssh -i YOUR_PEMFILE.pem user@publicdns/domainname

ex - ssh -i xyz.pem ec2-user@ec2-45-415-458.compute-1.amazonaws.com

 
Step 9 : Now you will connect to your AWS Account :)

Step 10 : At AWS account click on your instances, below you will find description tab under that public DNS(IPv4)  ec2-45-415-458.compute-1.amazonaws.com, click on that link you will redirect your web page of your instances.


Monday, October 29, 2018

How to Change 'Any' option in exposed filter in Drupal 8.


If you Want to Change label of "Any" in exposed filter option in Drupal 8. You can use "Better exposed filter" . here thesome step to change of Any text in D8.

Step 1 : Open your Better exposed filter setting and find out the filter in which you want to change the label.

Step 2: Scroll down at the bottom select  "More options for "field_ad_category_target_id(your filter name)".


Step 3 : Click on "Rewrite filter options"


Step 4 : put this in "Retrite the text option"

 example : - Any -| Your option

Step 5: in my case i want to change "Any" label to 'Your option'. i hope this will work for you :)

Wednesday, October 24, 2018

My trick to add Colorbox popup on Slideshow images in Drupal 8

Hello, If you want to show any slider image in the popup form on click on image
here is the my funny or easy trick to do it. i hope it will work for you :)

Trick 1 :-  I have a task that i have created a slider using image fieldslideshow , i have done this by using view and just set image formatter as image fieldslideshow but now requirement is that when we click on the image it should be open as colorbox popup.


solution : -
   step 1 :- I have added a same image field in view and set formatter "colorbox" and excluded that filed, its all because shwo we can found colorbox library on required page.

step 2 :-  just change twig file structure according colorbox :-

From :-

{% for key,value in url %}
            <img src="{{ value }}" />
        {% endfor %}


To :-

{% for key,value in url %}
    <a href="{{ value }}" class="colorbox cboxElement"><img src="{{ value }}" /></a>
    {% endfor %}

Step 3 :- Now you will be able to see popup on your slider image


Trick 2 - Need to add popup on field slide show image.

Step 1:- i have set filed slideshow on display format of image and link image to file.

Step 2:- create a other image field to and set Colorbox format to call Colorbox library, set a default image in this field, disable from disaplay form, and just add Css for display none.

Step 3 :- there is same structure which we want for colorbox popup except colorbox class so i have  added class using jquery

jQuery('.field--name-field-product-image .field-slideshow').find('a').addClass('colorbox cboxElement');


How to Show all products and node related to the node user


When we click on the node or product and you want to show show all the products related to the user who publish the current user. you have to apply filter user id filter i am showing you in the below post.


Step 1 : - Firstly you have to change the "url alias" for the node and need to add author name.

eg. if you have product content type your path pattern should be like              
 ( [node:title]/[node:author] ) this.

path pattern:- [node:title]/[node:author]


Step 2 :- You Need to add "user Name" contextual filter in the view block.
if your url link this ->  
http://115.166.142.238/souq_alhrag/ar/samsung-galaxy-j2-core/customer

http://<ip>/<projectname>/<language>/<nodeid>/<username>

select raw value under "Provide default value"and path alias 2 in my case.


Exclude current Node in Block view in Drupal 8

If you want to exclude current node and product in block view in drupal 8 pls follow the below steps.


Step 1 :-  Create a block view.

Step 2 :-  Add Content Under "Contextual Filters", select "Provide Default value"->"Content Id from url"


Step 3 :- Scroll Down at bottom and Check "Exclude" under "More".

 
Step 4 :- Apply filter and save changes , now only content id which is the url doesn't show in the block view.

Tuesday, October 23, 2018

How to Add Popup using jQuery

Add popup on any div using jQuery :-


HTML : -

<div class="disclaimer custom-popup">
    <div class="container">
        <div class="close">X</div>
        Lorem Ipsum is simply dummy text.
        </div>
    </div>
<div class="disclaimer-show">Disclaimer</div>


JQuery : -

jQuery(document).ready(function(){
    /*Disclaimer popup*/
jQuery('.disclaimer').hide();
jQuery(".disclaimer-show").bind('click', function () {
    jQuery(".disclaimer").show();
    jQuery(this).hide();
})

jQuery('.close').bind('click', function () {
    jQuery('.disclaimer').hide();
    jQuery('.disclaimer-show').show();
})

});


CSS : -
.custom-popup {
    position: fixed;
    top: 0;
    left: 0;
    width: 100%;
    height: 100%;
    background-color: rgba(255,255,255,0.85);
    z-index: 9999;
    overflow: auto;
    padding: 25px;
}
.custom-popup .container {
background-color: #fff;
    max-width: 1170px;
    margin: 50px auto;
    border: 1px solid #0098DB;
    padding: 30px 50px;
    position: relative;
}
.custom-popup .close {
    width: 32px;
    height: 32px;
    background-color: #0098DB;
    text-align: center;
    color: #fff;
    font-size: 22px;
    position: absolute;
    right: -15px;
    top: -15px;
    line-height: 32px;
} 


Add Node as a popup in Drupal 7

How to Show Any Node in the popup form in Drupal 7 :-


If you want to Show any node or page in the poup form when click on the link add the link in this format in your block.

 <div><a class="colorbox-node colorbox-node-gallery" href="/disclaimer?width=600&height=600" rel="gallery">My Popup Example</a></div>  


Monday, October 22, 2018

How To Translate Read more text in Drupal 7

Translate Read More link in drupal 7 : -

under config->translate interface click on translate tab, then select "Read More" string in string search.


 click on edit and then put your required string in required language.


 path : yourdomainname/admin/config/regional/translate/translate  

Sunday, October 21, 2018

Import and Export Database using ssh


Import Database using ssh :- 

 mysql -u <database_username> -p -D <Your_databasename> < <database_path>  
 Example :-   
  mysql -u abcpanam_devuser -p -D abcpanam_abcpanama < abcdistr_abcpanama(1).sql 


Export Database using ssh :- 

 [abcdistr@server ~]$ mysqldump -u abcdistr_ntf -p abcdistr_abcpanama > abcdistr_abcpanama.sql 


IMPORT AND EXPORT DATABASE AT lOCALHOST USING TERMINAL

Connect Terminal to database

 $ mysql -h 127.0.0.1 -u root  
 $ /opt/lampp/bin/mysql -uroot -ppassword  
 ntf-22@NTF-22:/$ /opt/lampp/bin/mysql -uroot (IF THERE IS NO PASSWORD) 


IMPORT :-

ntf-22@NTF-22:~$ sudo /opt/lampp/bin/mysql>mysql -u root ssh_test_db < /home/ntf-22/Desktop/abcdistr_abcgrouptt.sql  
ntf-22@NTF-22:~$ sudo /opt/lampp/bin/mysql>mysql -u <database_username> <database_name> < <downloaded_database_sql_file_path_at_your_system>  

EXPORT:-

ntf-22@NTF-22:~$ /opt/lampp/bin/mysql>mysqldump -u root -p ABC_magento_db > ABC_magento_db.sql  
 ntf-22@NTF-22:~$ /opt/lampp/bin/mysql>mysqldump -u <database_username> -p <database_name> > <new_database_name.sql> 

Basics Ubuntu Terminal commands


Some basics command to use terminal in Ubuntu Linux

S. NO
COMMAND
EXAMPLE
BRIEF DESCRIPTION
1.
cd <folder_name>
ntf-22@NTF-22:~$ cd /home/ntf-22/
To enter in a folder
2
cd  ..
ntf-22@NTF-22:~$ cd ..
exit from a folder
3
cd  /..
ntf-22@NTF-22:~$ cd /..
Exit from all folder and move at root
4
pkill  <software_name>
ntf-22@NTF-22:/$ pkill geany
Used to close specific software.
5
<software name>
ntf-22@NTF-22:/$ geany
Open directly through terminal
6
ssh username@domain
ntf-22@NTF-22:~$ ssh ntf-15@192.168.1.101

Connect other system using terminal
7
sudo mv frompath topath
ntf-22@NTF-22:/$ sudo mv opt/lampp/htdocs/swati-drupal home/ntf-22/Downloads

Move folder from terminal


8
sudo frompath/foldername  topath/folderRename
ntf-22@NTF-22:/$ sudo mv opt/lampp/htdocs/swati-drupal home/ntf-22/Downloads/swati-move
Move and Rename  folder using terminal
9
grep sshd /var/log/auth.log
ntf-22@NTF-22:~$ grep sshd /var/log/auth.log

Know whoes access your system and when .
10
gksu gedit /etc/hosts
ntf-22@NTF-22:~$ gksu gedit /etc/hosts
Search your website which you want to unblock and delete, if you want to block add url of the site.
11
mkdir <filename>
ntf-15@NTF-15:~/Music$ mkdir tt

Creating folder using command
11
rmdir <filename>

ntf-15@NTF-15:~/Music$ rmdir tt
Remove Folder Using command.
12
pwd
ntf-15@NTF-15:~$ pwd

Print Current Working Directory
Show in which directory are you working.
13
ls
ntf-15@NTF-15:~$ ls
Print List of Directory
14
history -c
ntf-22@NTF-22:/$ history -c
Clear history of open terminal.
15
cp -R source destination
ntf-22@NTF-22:~/Downloads$ cp -R /home/ntf-22/Downloads/testing /home/ntf-22/Desktop/
Copy and paste from terminal you can also copy and paste your file
16
zip -r folder.zip folder
ntf-22@NTF-22:~/Downloads$ zip -r testing.zip /home/ntf-22/Downloads/testing
Create zip file using terminal
17
pathwhereyouwanttoxtract$ unzip folder.zip
ntf-22@NTF-22:~/Downloads$ unzip drupal8.zip

Extract folder using terminal
18
$ passwd
ntf-22@NTF-22:~$ passwd

Change password for
system
19
$ scp source_path  user@domain:/destinationpath
ntf-22@NTF-22:~$ scp /home/ntf-22/Downloads/test.php ntf-15@192.168.1.101:/home/ntf-15/Desktop

Put file in other system
20
$ scp user@domain:/path yourpath
ntf-22@NTF-22:~$ scp ntf-15@192.168.1.101:/home/ntf-15/Desktop/t.png /home/ntf-22/Desktop/
Get from other system
21
php -m
ntf-22@NTF-22:~$ php -m
it shows the list of enable module in php
22
php -m | grep <name of extention>

ntf-15@NTF-15:/$ php -m | grep ctype

Checking extension enable or not in your php server
23
sudo apt-get install php7.0- <name of extention>
ntf-15@NTF-15:/$ sudo apt-get install php7.0-dom
To install php extension in server

How to Connect ssh in ubuntu linux.


Connect Cpanel using ssh in Ubuntu linux :-
 
  1. Create ssh key 
  2. Authorize key
  3. Download id_rsa.pub file
  4.  Put this file at your system where ever you want. In my case i always prefer Desktop
  5. Open your Terminal 
  6. Open Folder where have you put id_rsa.pub file like
     ntf-22@NTF-22:/$ cd home/ntf-22/Desktop/ 
  
   7) Now You will see like this            

     ntf-22@NTF-22:~/Desktop$   
  
  8) Here you have entered in Desktop folder
    9) connect ssh using pub file
    ntf-22@NTF-22:~/Desktop$ ssh -i id_rsa abcdistr@abcdistributionusa.com  


10) Connect SSH when specific port is define  
   ssh -p 2222 abcpanam@162.241.224.18  
   ntf-22@NTF-22:~$ ssh -i id_rsa.pub -p 2222 abcpanam@abcpanamainc.com 

 
 The main ssh Connect command is (ssh -i <name_of_pub _file> username@domain)  
  In my case pub fille
  name is = id_rsa
  Username = abcdistr
  Domain = abcdistributionusa.com
 
 eg.
 10) Enter Cpanel password
   abcdistr@abcdistributionusa.com's password:  
 
  11) you will see like this   
   Last login: Fri Dec 15 09:39:53 2017 from 115.166.142.238  
   [abcdistr@server ~]$  
  
  12) You have successfully access using ssh but if you get ssh enable error then consult with  help and support they will enable ssh for your account. :)

Saturday, October 20, 2018

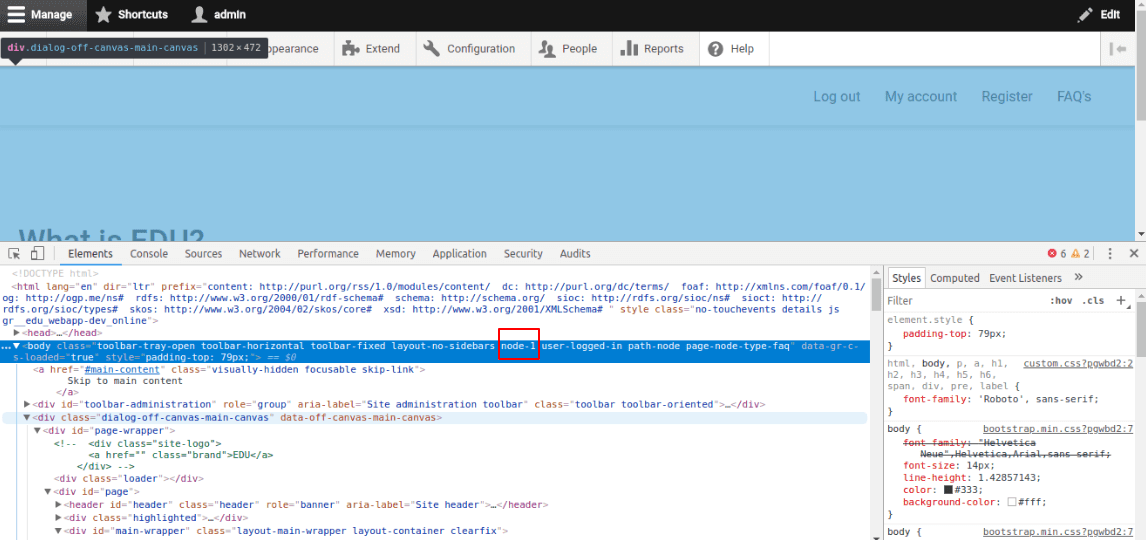
How to add missing node id in Drupal 8

Add Missing Node id in drupal 8 :- 


By default node id will not be there in the drupal 8. to enable this you have to add this code in your .theme file ->

   function THEMENAME_preprocess_html(&$variables) {  
    // Add node id to the body class.  
    $node = \Drupal::routeMatch()->getParameter('node');  
    if($node) {  
     $variables['attributes']['class'][] = 'node-' . $node->id();  
    }  
   }  

Most important module list in Drupal 7

 Sr.  no.
    Module name
   Installation url
  Brief Description
1
Administration menu
https://www.drupal.org/project/admin_menu
Used for drop down admin menu.
2
Front page
https://www.drupal.org/project/front
Used for different front page for anonymous and authentic user.
3
Backup and Migrate
https://www.drupal.org/project/backup_migrate
To take backup from site.
4
Ckeditor
https://www.drupal.org/project/ckeditor
For best html editor.
5
Flexslider
https://www.drupal.org/project/flexslider
Used for image slider.
6
Panel
https://www.drupal.org/project/panels
Create page layout for content type with block field and views.
7
Module filter
https://www.drupal.org/project/module_filter
Filter module from module name if you have lots of modules.
8
Newsletter
https://www.drupal.org/project/newsletter
For subscribe website it show a subscribe link with the form.
9
Pathauto
https://www.drupal.org/project/pathauto
Automatic provide path for content type and user and for all nodes.
10
poll
https://www.drupal.org/project/poll
Create online voting in drupal 7.
11
Views
https://www.drupal.org/project/views
Most important and backbone of Drupal.
12
Php filter
Core module
Enable to add php code field in text format of the block.
13
Entity reference
https://www.drupal.org/project/entityreference
Create taxonomy reference and relationship with view.
14
Webform
https://www.drupal.org/project/webform
To create contact form.
15
File (field) path
https://www.drupal.org/project/filefield_paths
Specify the diiferent storing path of image and other file for different content type and also create a diiferent folder for storing purpose.
16
String Override
https://www.drupal.org/project/stringoverrides
Replace the by default message text.
17
Calendar
https://www.drupal.org/project/calendar
To create calendar and filter date wise content with view.
18
Owl carousel
https://www.drupal.org/project/owlcarousel
Nice slider with fields like title body author name.
19
Colorbox
https://www.drupal.org/project/colorbox

20
Menu Attribute
https://www.drupal.org/project/menu_attributes
Add class ,id, style, attribute to menu.
21
Modal form
https://www.drupal.org/project/modal_forms
Used for show all form in a popup.
22
Commerce wishlist
https://www.drupal.org/project/commerce_wishlist
Used to create fav. List or wishlist in drupal commerce.
23
Css injector
https://www.drupal.org/project/css_injector
To add css property from website or from admin dashboard.
24
Scroll to top
https://www.drupal.org/project/scroll_to_top
It added back to top arrow and scroll smoothly the page at top.
25
Sticky Navigation
https://www.drupal.org/project/stickynav
Used to create sticky menu.
26
Block Class
https://ftp.drupal.org/files/projects/block_class-7.x-2.3.zip
Used to add class to specific block.
27
Floating block
https://www.drupal.org/project/floating_block
To Create sticky block and you can also use both id and css for this.
28
Block Attribute
https://www.drupal.org/project/block_attributes
Used to add attribute in block like style, id, css.
29
Drupal Chat
https://www.drupal.org/project/drupalchat
Purpose of module chatting with other user.
30
Animate Any
https://www.drupal.org/project/animate_any
Animate any content of of page on page load.
31
Organic Group
https://www.drupal.org/project/og
Enable users to create and manage their own 'groups'.
32
Block Class
https://www.drupal.org/project/block_class
Block Class allows users to add classes to any block through the block's configuration interface
33
Responsive Menu
https://www.drupal.org/project/responsive_menus
Responsify your menus! Just give me a CSS/jQuery style selector of your menu and I will make it mobile friendly
34
Superfish Menu
https://www.drupal.org/project/superfish
Superfish integrates jQuery Superfish plugin with your Drupal menus.
35
TB Mega Menu
https://www.drupal.org/project/tb_megamenu
TB Mega Menu allows you to create a mega menu with an innovative back-end user interface and synchronized with Drupal core menu.
36
Quick Tab
https://www.drupal.org/project/quicktabs
The Quick Tabs module allows you to create blocks of tabbed content, specifically views, blocks, nodes* and other quicktabs*. You can create a block on your site containing multiple tabs with corresponding content.
37
Field Permission
https://www.drupal.org/project/field_permissions
The Field Permissions module allows site administrators to set field-level permissions to edit, view and create fields on any entity.
38
Panel Extra LAyout
https://www.drupal.org/project/panels_extra_layouts
Panels is one of the most, if not the most, powerful modules for laying out a page in Drupal.
40
Menu Per Role
https://www.drupal.org/project/menu_per_role
This module allows you to restrict access to menu items based on user roles. Just activate the module and edit a menu item as usual. There will be a new fieldset that allows you to restrict access by role.
41
Twilio (Send Message To Phone)
https://www.drupal.org/project/twilio
The Twilio module provides integration with the Twilio cloud communication platform allowing for your Drupal site to integration Voice and SMS functionality.
42
Better Exposed filter
https://www.drupal.org/project/better_exposed_filters
the Better Exposed Filters module replaces the Views' default single- or multi-select boxes with radio buttons or checkboxes, respectively. Description fields and Select All/None links can be added to exposed filters to make for a better user experience.
43
Read More
https://www.drupal.org/project/readmore
Add read more link on body and show without refresh page.
44
Context module
https://www.drupal.org/project/context
Used for creating differnt layout for different content type and node it work as a panel module.
45
context by node
https://www.drupal.org/project/context_by_node
Context by node allows you to create a context for each node. The context created will apply just for that node.
46
context node
https://www.drupal.org/project/context_node
Context Node allows you to select a predefined context when creating a node.
47
Word count
https://www.drupal.org/project/wordcount
Count words according to creatore user /Used to see particular user creates node. Check in the report->word count
48
Read time
https://www.drupal.org/project/read_time
Display the recuired to read specific node.
49
Node view count
https://www.drupal.org/project/nodeviewcount
Display the total view of particular node and dispaly using default node.
50
Hierarchical Select
https://www.drupal.org/project/hierarchical_select
Display sub term of texonomy in hierarical.
51
Taxonomy menu
https://www.drupal.org/project/taxonomy_menu
Added sub term as sub menu of main menu
52
Feeds Module
https://www.drupal.org/project/feeds
Added multiple notes at a single import click using csv.
53
PDF using MPDF
https://www.drupal.org/project/pdf_using_mpdf
Used to generate pdf from html
54
Boost module
https://www.drupal.org/project/boost
Used to increase site performance.
55
File Entity
https://www.drupal.org/project/file_entity
Used to show file tab in admin section

56
Adminstration View
https://www.drupal.org/project/admin_views
Used to Show filters in administration section
57
Rabbit Hole
https://www.drupal.org/project/rabbit_hole
Used to Access denied on node but can display in the other format like view block , page , slider for annonumous user
58
Bean Module
https://www.drupal.org/project/bean
Used to add fields in cutom block in drupal 7